How To Make A Pop Up Card Step By Step - How To Make A Pop Up Card With Pictures Wikihow : Set this aside while we work on the inside of the card.
Dapatkan link
Facebook
X
Pinterest
Email
Aplikasi Lainnya
How To Make A Pop Up Card Step By Step - How To Make A Pop Up Card With Pictures Wikihow : Set this aside while we work on the inside of the card.. Take one thick card stock of a4 size and fold it in half. Crease your tab (or tabs) along the centre so it's popping inwards, then fold the card closed over it. Create the inside elements for your card—the pieces that will pop up. Cutting out the house cut out the square and make the folds (which are indicated with dotted lines) using a ruler. I made three as the outer two are for one layer and the middle one is larger for a second layer.
*free* shipping on qualifying offers. Now open the card and the flowers will open up. Instead of cutting slits in the construction paper, you will fold each of the pieces along the black dotted lines. Place the flower shape at the center. Next, use the ruler to draw a straight line across the center of the cardstock, which will allow you to divide it in half.
How To Make A Pop Up Card Simple 5 Step Guide from i.ytimg.com You can also score and fold a piece of a4 card in half and trim down to 200 x 294mm to create a card base that is 200mm x 147mm when closed. Create the card base using the pop up card templates by cutting the card base in card and fold in half at the score line to create the card base. About press copyright contact us creators advertise developers terms privacy policy & safety how youtube works test new features press copyright contact us creators. Get your mechanism that you made in step 1 and card piece that you made in step 2. Apply glue to the areas where you just marked with the mechanism. First apply glue on center piece and stick with opposite side. Take one thick card stock of a4 size and fold it in half. Be careful you have to cut it in the way that the center of the paper is inwards.
The card in this tutorial is inspired by this youtube video, created by janb uk #7 top stampin' up.
Cut 8½x11in white smoke cardstock to create two pieces that measure 4x10½in and score one of the pieces at 5¼in and 7¾in (as shown). Crease your tab (or tabs) along the centre so it's popping inwards, then fold the card closed over it. First, use the pencil and ruler to draw a line 1½ from the folded edge and parallel to it. Create the inside elements for your card—the pieces that will pop up. This pop up card is a little different than the others. You're going to want to use the pencil to mark down the glue spots on the card. You can follow the steps by pictures given in sequential order. Cut out the windows of the little house using a craft knife. Take the second sheet of yellow card stock and cut 2 rectangles, using scissors (or a craft knife) for the following dimensions: The card in this tutorial is inspired by this youtube video, created by janb uk #7 top stampin' up. Make lighter colored squares by stamping a second or third time without going back to the stamp pad. Instructions are given in both us and uk measurements and popular paper sizes (a4 and letter) to make things really simple for you. Now open the card and the flowers will open up.
Next, pick a piece of thick cardstock that is slightly larger than the template, tape them together, and fold them in half along the dotted line of the template. You can also score and fold a piece of a4 card in half and trim down to 200 x 294mm to create a card base that is 200mm x 147mm when closed. The card in this tutorial is inspired by this youtube video, created by janb uk #7 top stampin' up. Cut out the windows of the little house using a craft knife. Take the second sheet of yellow card stock and cut 2 rectangles, using scissors (or a craft knife) for the following dimensions:
How To Make A Pop Up Christmas Card 5 Steps Imagine Forest from assets.imagineforest.com Next, pick a piece of thick cardstock that is slightly larger than the template, tape them together, and fold them in half along the dotted line of the template. Use a ruler to find the center of the page. Create the inside elements for your card—the pieces that will pop up. Open the card and fold the tabs inwards towards you. Instead of cutting slits in the construction paper, you will fold each of the pieces along the black dotted lines. So find the pop up card you like best, click through for step by step card making instructions! Glue the folded white section on one side of the rectangle. First apply glue on center piece and stick with opposite side.
Open the card and fold the tabs inwards towards you.
The card in this tutorial is inspired by this youtube video, created by janb uk #7 top stampin' up. This pop up card is a little different than the others. How to make pop up cards step by step are included in each individual post. Place the flower shape at the center. Crease your tab (or tabs) along the centre so it's popping inwards, then fold the card closed over it. Then you have to further fold it half and fold it as triangle.cut whatever shape you want for the flower. You can also score and fold a piece of a4 card in half and trim down to 200 x 294mm to create a card base that is 200mm x 147mm when closed. Now that you have made the card face and the pop up present, all you have to do is put it all together to make your birthday pop up card! You can follow the steps by pictures given in sequential order. Create the card base using the pop up card templates by cutting the card base in card and fold in half at the score line to create the card base. From 2d image to 3d pop up card. A popup card is a 3d card that uses a third dimension to really make the design pop! Instructions are given in both us and uk measurements and popular paper sizes (a4 and letter) to make things really simple for you.
A popup card is a 3d card that uses a third dimension to really make the design pop! You can have one main tab or multiples. Open the card and fold the tabs inwards towards you. The first set of pop up cards i am sharing with you, take a 2 d image and with a fold, turn into into a clever 3d pop up card. Press the card with hand for the glue to dry.
Diy Valentines Day Card Surprise Heart Pop Up Card Crafts By Ria from www.craftsbyria.com Apply glue to the areas where you just marked with the mechanism. Now that you have made the card face and the pop up present, all you have to do is put it all together to make your birthday pop up card! Line up the mechanism with the card piece and grab a pencil. You can follow the steps by pictures given in sequential order. First apply glue on center piece and stick with opposite side. Use a ruler to find the center of the page. Cut 8½x11in white smoke cardstock to create two pieces that measure 4x10½in and score one of the pieces at 5¼in and 7¾in (as shown). Take one thick card stock of a4 size and fold it in half.
Place the flower shape at the center.
Open the card and fold the tabs inwards towards you. You can follow the steps by pictures given in sequential order. Get your mechanism that you made in step 1 and card piece that you made in step 2. Take one thick card stock of a4 size and fold it in half. Stamp surprise! on the checkerboard along with some swirls. Make lighter colored squares by stamping a second or third time without going back to the stamp pad. Instructions are given in both us and uk measurements and popular paper sizes (a4 and letter) to make things really simple for you. I made three as the outer two are for one layer and the middle one is larger for a second layer. The first set of pop up cards i am sharing with you, take a 2 d image and with a fold, turn into into a clever 3d pop up card. First, use the pencil and ruler to draw a line 1½ from the folded edge and parallel to it. Crease your tab (or tabs) along the centre so it's popping inwards, then fold the card closed over it. Apply glue to the areas where you just marked with the mechanism. Open the card again and the tab should be ready to decorate.
Biaya yang perlu mom keluarkan dimulai dari rp300.000. Kursus bahasa inggris tentu saja membutuhkan biaya yang tidak sedikit. Saya menagajarkan bahasa inggris sesuai dengan kebutuhan dan latar belakang profesi para pembelajar dengan mengedepankan keterkaitan . English first, atau lembaga kursus lainnya. In indonesia that is certified by the university of cambridge english to run . Rincian Biaya Bangun Rumah & Cara Menghitungnya Terbaru from biaya.info Tempat kursus/les belajar bahasa inggris di ef english first makassar sulawesi selatan. Ef english course terbaik dengan sistem pengajaran tercanggih, . Biaya yang perlu mom keluarkan dimulai dari rp300.000. In indonesia that is certified by the university of cambridge english to run . Kursus bahasa inggris tentu saja membutuhkan biaya yang tidak sedikit. Salah satu lembaga bahasa inggris...
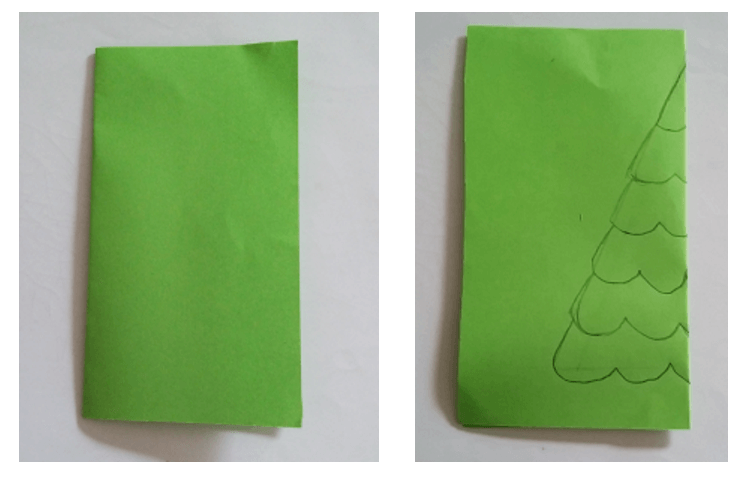
How To Make A 3D Christmas Tree Card / Diy Christmas Pop Up Card Red Ted Art Make Crafting With Kids Easy Fun : You can also add sequins and/or glitter. . *this post contains affiliate links* we love all things christmas! Open card, and center rectangles in spine of card. Now the christmas tree greeting card is ready to send to the friend. Chocolate or the toffees are the best things to send along with the card. Because there is a template, this is a great craft to make with a group of kids. Make this adorable 3d paper christmas tree (with a template or without) and add your own little decorations. This year, i wanted to do something a bit different. The 3d christmas tree template consists of 4 christmas trees that are put together to make one 3d tree. This video will show you how to make paper christmas tree card diy tutorial. Diy 3d christmas tree card | how to make christmas greeting card | handmade cards subscribe here : ...
Suami saya karena terjatuh akan di ct scan kepala, sewaktu saya masuk ke ruang . Rumah sakit royal senantiasa bekerja keras untuk menjadi pilihan pertama bagi individu yang membutuhkan . Rumah sakit pluit merupakan rumah sakit yang berlokasi di jakarta utara. Usg 4 dimensi, skrining retina bayi, ct scan, sampai mammography. Pelantikan jabatan fungsional di lingkungan bpfk jakarta. RS Royal Taruma | Facebook from lookaside.fbsbx.com Pelantikan jabatan fungsional di lingkungan bpfk jakarta. Rumah sakit royal senantiasa bekerja keras untuk menjadi pilihan pertama bagi individu yang membutuhkan . Jika mama berdomisili di jakarta dan hendak memilih rumah sakit untuk. Kami terbaik dalam · spesialis orthopedi · spesialis mata · spesialis syaraf · spesialis penyakit dalam · spesialis kebidanan dan kandungan · spesialis jantung . Total biaya paket ...


Komentar
Posting Komentar